20 Junk Jewelry Crafts to Upcycle

Spread the love

Upcycling broken, mismatched, and vintage junk jewelry has become one of the most profitable and creative trends in the eco-friendly craft marketplace. Thrift stores, estate sales, and forgotten jewelry boxes are overflowing with single earrings, snapped chains, loose rhinestones, and tarnished brass charms waiting for a second life. By reimagining these discarded components through artistic craftsmanship, you can transform low-cost junk jewelry into high-value, aesthetic decor, wearables, and keepsakes that thrive on platforms like Pinterest and Etsy.

Below is an extensive guide featuring 20 Aesthetic & Inspiring Broken & Vintage Junk Jewelry Upcycling Ideas, complete with detailed breakdowns of the concept, step-by-step tutorials, insider tips, variations, and material checklists for each project.
1. Vintage Rhinestone & Pearl Framed Mosaic Tree

What This Idea Means

A rhinestone and pearl mosaic tree takes mismatched vintage brooches, single clip-on earrings, and loose faux pearls, arranging them artfully onto a velvet-lined frame to form a sprawling, glittering tree of life. This high-end wall decor piece appeals to collectors of heirloom art and antique aesthetics.

How to Make It

  1. Prepare the Canvas: Dismantle a vintage picture frame and wrap the backing board with deep emerald green, navy, or black velvet, securing it at the back with hot glue or fabric adhesive.
  2. Sketch the Silhouette: Lightly outline a twisted tree trunk and branch structure on the velvet using a chalk pencil.
  3. Build the Trunk: Arrange dark bronze chains, antique filigree pieces, or copper metal strands along the trunk area, securing them with industrial strength clear adhesive (E6000).
  4. Fill the Foliage: Layer broken rhinestone brooches, crystal earrings, and faux pearls along the branches to create dense, shimmering foliage. Overlap smaller pieces on top of larger ones to add depth.
  5. Final Assembly: Allow the adhesive to cure completely for 24 hours before reassembling the frame without the glass pane to display the 3D texture.

Tips & Variations

  • Tip: Use wire cutters to nip off the back pins and clip-on mechanisms from old jewelry pieces so they sit completely flat against the velvet backing.
  • Variation: Craft seasonal variations, such as an all-white and silver “Winter Snowflake Tree” or an autumnal version using amber, topaz, and gold-tone junk jewelry.

What You Need

  • Vintage picture frame (10×12 inches or larger)
  • Dark velvet fabric (Emerald green, Navy, or Black)
  • Broken rhinestone brooches, single earrings, and faux pearls
  • Wire cutters & needle-nose pliers
  • E6000 craft adhesive or heavy-duty hot glue gun

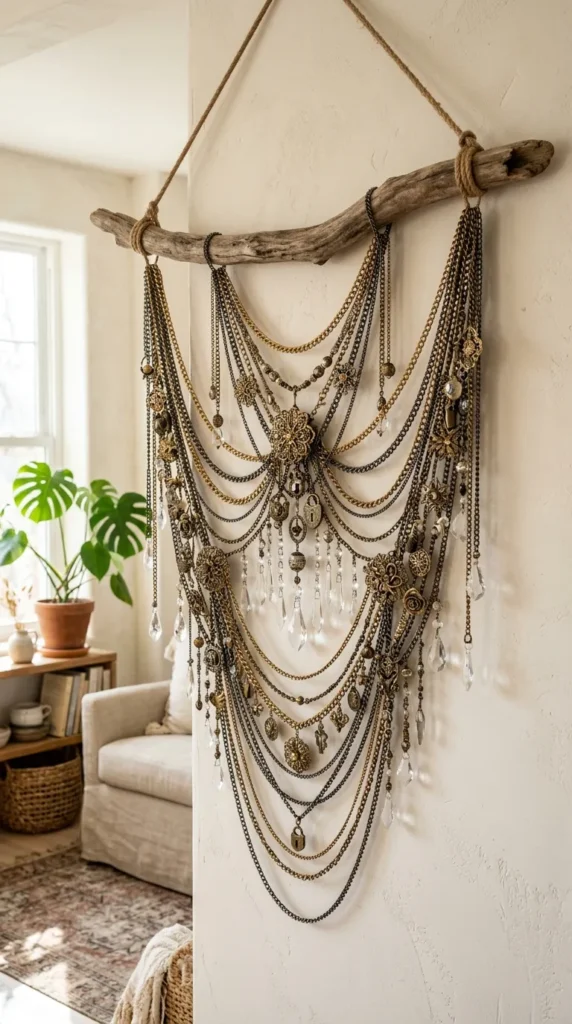
2. Upcycled Brooch & Chain Boho Statement Wall Hanging

What This Idea Means

This craft combines vintage metallic jewelry elements with modern boho fiber art. Spirling lengths of mixed-metal chains, cascading crystal chandelier drops, and centerpiece brooches are suspended from a natural driftwood branch or brass rod, creating a dynamic wall piece that catches light.

How to Make It

  1. Prepare the Anchor: Clean and lightly sand a curved piece of driftwood or select a polished brass curtain rod.
  2. Sort and Drape Chains: Cut various lengths of gold, silver, bronze, and copper chains salvaged from broken necklaces. Attach them across the branch at varying loop depths using jump rings.
  3. Attach Focal Brooches: Secure large, ornate vintage brooches at key intersection points along the draped chains using jewelry wire or jump rings.
  4. Add Hanging Crystal Drops: Suspend faceted glass crystals or teardrop pearls from the bottom ends of the chains to weight them down and create fluid vertical movement.
  5. Add Hanging Fixture: Tie a sturdy braided cord or chain to both ends of the wood branch for easy wall mounting.

Tips & Variations

  • Tip: Mix metallic tones freely; blending aged brass, gunmetal, and bright gold creates a rich, curated bohemian texture.
  • Variation: Interweave macramĂ© cord or raw silk ribbon strands alongside the metal chains for a softer, textile-heavy aesthetic.

What You Need

  • Driftwood branch or polished brass rod
  • Assorted metal chains from broken necklaces
  • Ornate vintage brooches & statement pendants
  • Faceted crystal drops & glass prisms
  • Jump rings, jewelry wire, and pliers

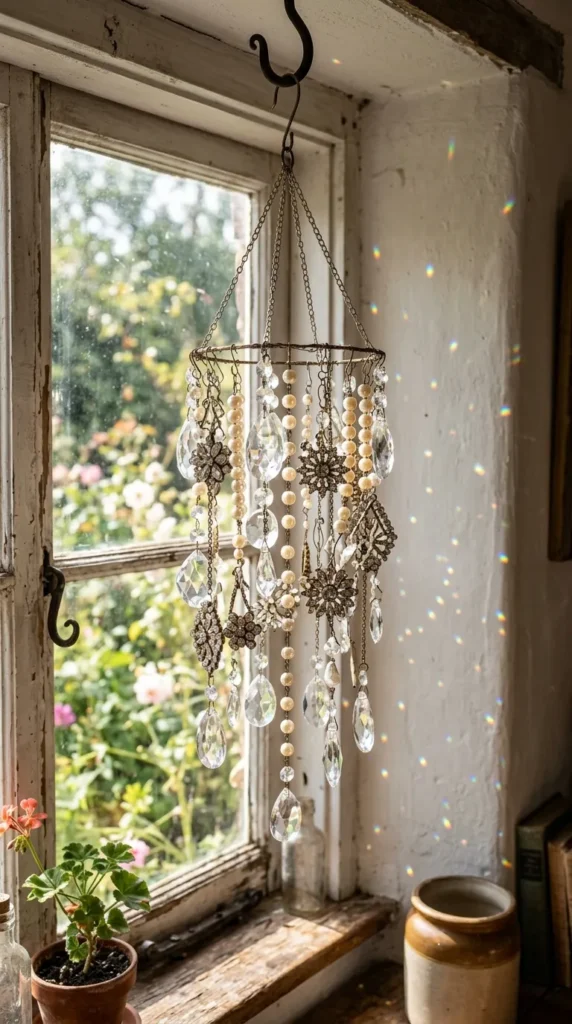
3. Antique Crystal & Chandelier Drop Wind Chime

What This Idea Means

Transforming broken crystal earrings, beaded necklaces, and vintage chandelier prisms into a sun-catching wind chime brings movement, light, and delicate sound to outdoor porches or sunny windows. When hit by light, it projects micro-rainbows across the room.

How to Make It

  1. Select the Top Base: Use an upcycled brass teapot lid, a small embroidery hoop wrapped in metallic ribbon, or a filigree metal bowl as the top hanger.
  2. Construct Hanging Strands: Thread flexible bead-stringing wire with a mix of vintage crystal beads, glass pearls, and metal spacers salvaged from unstrung necklaces.
  3. Attach Pendant Ends: Crimp a heavy crystal prism or large crystal earring to the bottom end of each strand using crimp beads and pliers.
  4. Mount Strands to Base: Drill micro-holes around the perimeter of your base (if using metal) or loop wire securely around the hoop, spacing 6 to 8 strands evenly.
  5. Attach Center Sound Striker: Hang a heavy metal brooch or brass medallion in the very center, slightly lower than the surrounding strands, so they strike against it in the breeze.

Tips & Variations

  • Tip: Use coated stainless steel jewelry wire (49-strand) to ensure the wind chime withstands outdoor weather without snapping.
  • Variation: Keep the chime indoor-only as a “Suncatcher Mobile” hung directly in front of a south-facing window.

What You Need

  • Metal base (Filigree bowl, brass ring, or teapot lid)
  • Vintage glass crystal beads & unstrung bead strands
  • Chandelier prisms or large crystal pendants
  • Coated jewelry wire & crimp beads
  • Jewelry pliers & crimping tool

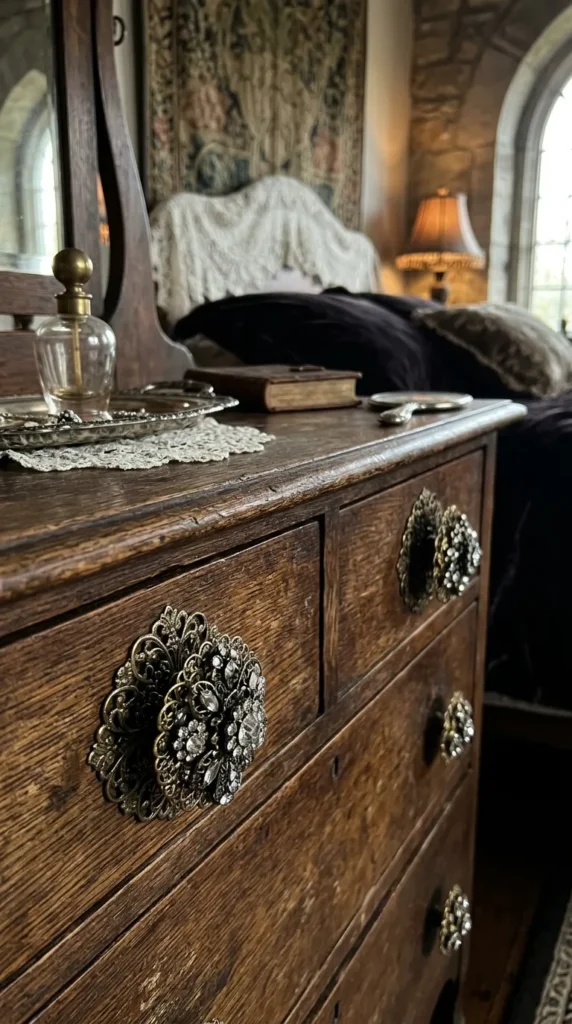
4. Vintage Filigree & Rhinestone Drawer Knobs

What This Idea Means

Old dressers, nightstands, and cabinets instantly gain custom luxury appeal when fitted with hardware made from upcycled jewelry. Ornate metal filigree brooches, large rhinestone buttons, and stacked vintage earrings are fused onto plain metal cabinet knobs to create boutique furniture hardware.

How to Make It

  1. Prep Plain Knobs: Lightly sand the flat surface of basic flat-top brass or wooden drawer knobs to create a rough texture for bonding. Wipe clean with rubbing alcohol.
  2. Flatten Jewelry: Remove all pin backs, clips, or pendant loops from selected brooches or large cluster earrings using flush wire cutters.
  3. Layer Components: Stack smaller jewelry pieces on top of larger filigree bases using two-part epoxy glue to build a layered 3D medallion.
  4. Adhere to Knob: Apply a generous drop of two-part epoxy to the top of the knob base, press the assembled jewelry piece firmly into place, and secure with painter’s tape while curing.
  5. Cure & Seal: Allow the epoxy to cure for 24 hours. Optional: Apply a clear gloss spray varnish over the metal top to prevent tarnishing from frequent hand contact.

Tips & Variations

  • Tip: Two-part clear epoxy provides a far stronger hold than hot glue or super glue for items that will be pulled frequently.
  • Variation: Use matching color-themed brooches (e.g., all turquoise or all ruby red) to create cohesive sets of 4 or 6 for reselling as decor kits.

What You Need

  • Basic flat-top drawer knobs (Metal or Wood)
  • Flat vintage brooches, earrings, or metal buttons
  • Two-part clear epoxy adhesive
  • Sandpaper & rubbing alcohol
  • Flush wire cutters & painter’s tape

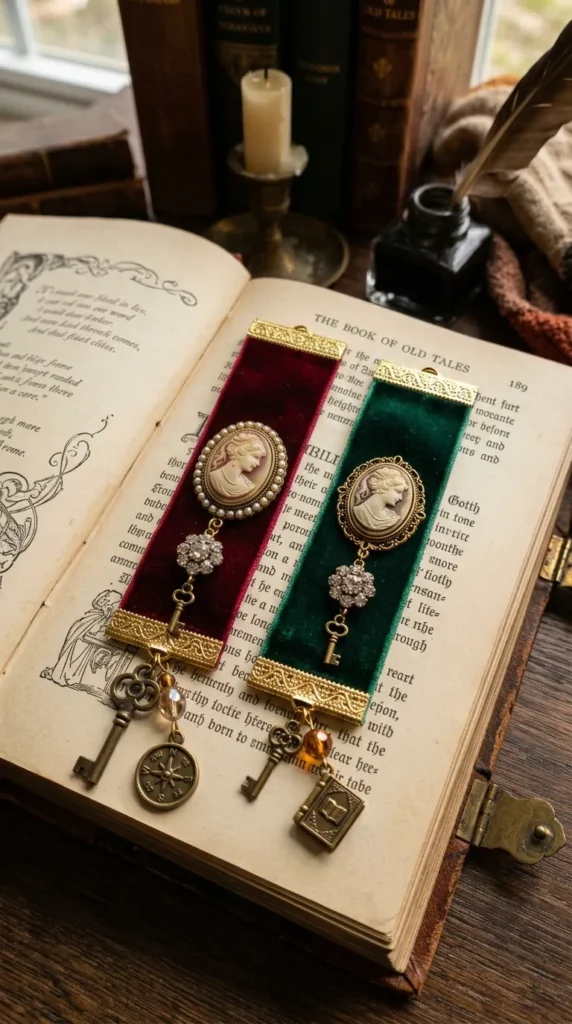
5. Ornate Brooch-Embellished Velvet Bookmarks

What This Idea Means

Vintage-loving readers appreciate luxury literary accessories. Ornate brooch-embellished bookmarks pair plush double-sided velvet ribbon with dangling vintage jewelry charms, clip-on earrings, or small brooches, creating a romantic accessory ideal for gift shops and online stores.

See also  22 Beaded Apple Craft Ideas

How to Make It

  1. Cut Ribbon: Cut a 10 to 12-inch strip of thick (1 to 1.5 inch wide) double-sided velvet ribbon in rich jewel tones like burgundy, emerald, or midnight blue.
  2. Attach Ribbon Clamps: Crimp metal ribbon crimp ends onto both raw ends of the velvet ribbon using flat-nose pliers.
  3. Select Jewelry Charms: Remove the backings from small vintage brooches, single earrings, or lockets. Attach a jump ring to the top loop.
  4. Connect Charms to Ends: Attach the prepared jewelry pieces to the loops on the ribbon crimps using jump rings.
  5. Finish Edges: Secure the ribbon inside the crimp with a small dot of fabric glue before clamping for extra durability.

Tips & Variations

  • Tip: Singe the raw edges of the velvet ribbon lightly with a lighter before applying crimps to prevent fraying.
  • Variation: Add small vintage keys or tiny photo lockets filled with antique book quotes to one end of the bookmark.

What You Need

  • Double-sided velvet ribbon (1 to 1.5 inches wide)
  • Metal ribbon crimp ends (Matching ribbon width)
  • Small vintage brooches, earrings, or lockets
  • Jump rings & jewelry pliers
  • Fabric glue & lighter

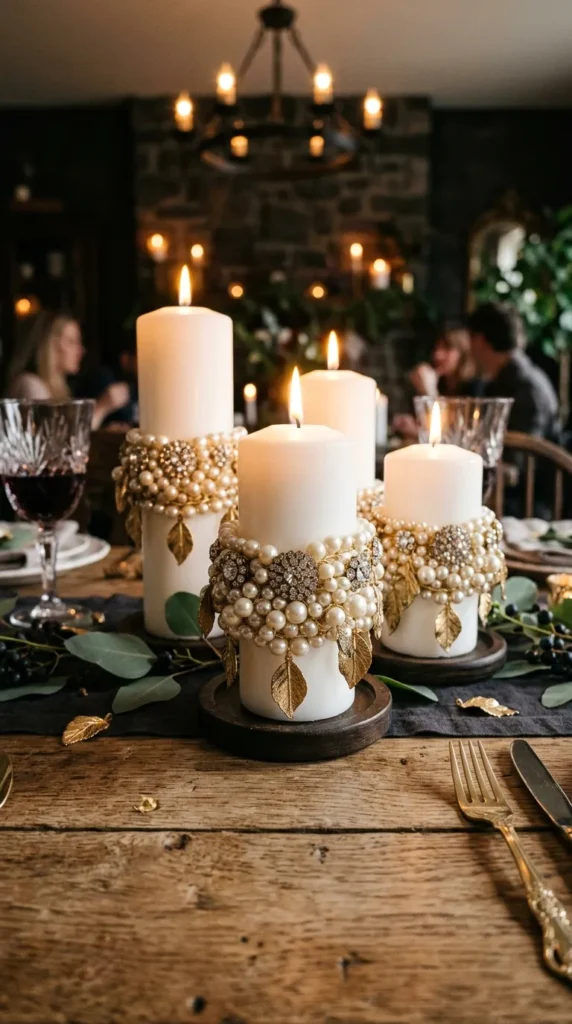
6. Upcycled Pearl & Rhinestone Pillar Candle Rings

What This Idea Means

Decorative candle rings add glamour to dining table centerpieces and mantel displays. By wrapping flexible wire rings with strands of salvaged faux pearls, broken rhinestone chains, and glittering metal leaf charms, you create reusable candle accessories that turn plain pillar candles into luxury decor.

How to Make It

  1. Form the Wire Ring: Shape 16-gauge floral wire into a circle slightly larger than the diameter of a standard pillar candle (approx. 4 to 5 inches), twisting the ends to secure.
  2. Wrap Base Ribbon: Wrap the wire ring with thin metallic ribbon or floral tape to cover the bare wire.
  3. Secure Pearl Strands: Wrap unstrung or broken strands of vintage faux pearls tightly around the ring base, securing the ends with fine gauge wire.
  4. Attach Rhinestone Accents: Nest cluster earrings, rhinestone brooch fragments, or metal floral charms into the pearl strands, securing them with thin silver paddle wire.
  5. Style: Slip the finished ring around the base of a glass LED or wax pillar candle.

Tips & Variations

  • Tip: Ensure all jewelry components sit flush facing outward so the candle sits stably inside the ring without tipping.
  • Variation: Create mini versions designed to fit around the stems of wine glasses for high-end dinner party markers.

What You Need

  • 16-gauge floral wire & thin 24-gauge wrapping wire
  • Broken strands of faux pearls
  • Rhinestone earring clusters & brooch fragments
  • Metallic ribbon or floral tape
  • Wire cutters & pliers

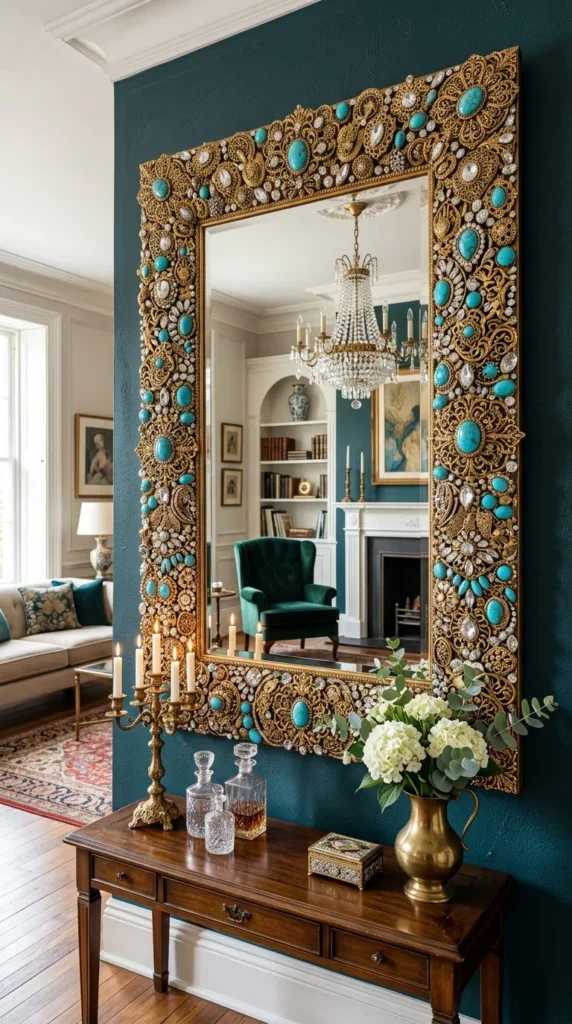
7. Vintage Jewelry Pillar & Wall Mirror Frames

What This Idea Means

Mosaic mirror frames made from dense collections of vintage jewelry pieces are true showstoppers. Covering a plain flat wooden frame with a collage of gold filigree, colorful glass cabochons, and sparkling rhinestones yields a regal statement mirror with high resale value.

How to Make It

  1. Prepare Frame Surface: Sand a wide, flat wooden picture frame or mirror border. Paint it with dark acrylic paint (black, gold, or bronze) so any tiny gaps between jewelry won’t show light wood.
  2. Prep Jewelry: De-pin and remove loops from dozens of junk jewelry pieces, sorting them by size and color.
  3. Place Anchor Pieces: Glue your largest statement brooches at the four corners and midpoints of the frame using E6000 adhesive.
  4. Fill Interstitial Spaces: Fill the remaining areas with medium earrings, charms, and individual rhinestones, tightly nestling them together like a puzzle.
  5. Fill Micro-Gaps: Glue loose flat-back pearls or tiny seed beads into any tiny remaining gaps using fine-tip adhesive.

Tips & Variations

  • Tip: Work in small 3-inch sections at a time so your adhesive doesn’t dry before you finish arranging the jewelry pieces.
  • Variation: Use an monochromatic color scheme—such as all-silver and clear crystal jewelry—for a sleek Hollywood Regency look.

What You Need

  • Wide flat wooden mirror frame
  • Large quantity of broken brooches, earrings, and charms
  • Dark acrylic paint & paintbrush
  • E6000 or two-part clear epoxy
  • Fine tweezers & flush wire cutters

8. Gothic Vintage Cameo & Chain Choker Necklaces

What This Idea Means

Repurposing isolated vintage cameos, oval stone pendants, and brass filigree settings into gothic, victorian, or cottagecore chokers caters directly to booming alternative fashion markets on Pinterest and Etsy.

How to Make It

  1. Measure Neckline: Cut a 12-inch piece of black lace, velvet, or organza trim, adding 2 inches of extension chain at the back for adjustability.
  2. Attach Clasp Hardware: Clamp ribbon ends onto the ends of the lace, attaching a lobster claw clasp to one side and a length of cable chain to the other.
  3. Prepare Center Cameo: Take a single vintage cameo brooch or oval stone setting, remove the pin back, and attach a bail or jump ring to the top center.
  4. Mount Pendant: Attach the cameo directly to the middle of the lace band using a sturdy jump ring.
  5. Drape Accent Chains: Suspend thin gunmetal or brass chains in small swags underneath the center cameo for added victorian drama.

Tips & Variations

  • Tip: Check that the cameo setting sits flat against the collarbone by testing the weight distribution before finalizing chain attachments.
  • Variation: Replace lace with wide satin ribbon for a softer, softer regency-core aesthetic.

What You Need

  • Black lace or velvet ribbon trim
  • Vintage cameo brooch or oval pendant
  • Ribbon end clamps, lobster clasps, & extension chains
  • Thin accent chains & jump rings
  • Jewelry pliers & E6000

9. Layered Junk Jewelry Decorative Trinket Bowls

What This Idea Means

Plain glass or ceramic trinket dishes become opulent vanity accessories when coated on the exterior with a mosaic layer of brass filigree, vintage watch gears, and colorful rhinestone jewelry fragments. They make exquisite ring dishes or vanity accents.

How to Make It

  1. Select Base Dish: Choose a clear glass or smooth ceramic bowl or dish (approx. 4 to 6 inches wide).
  2. Clean Surface: Wipe the outer surface thoroughly with rubbing alcohol.
  3. Deconstruct Jewelry: Strip all pins, backs, and thick posts from small metal jewelry, vintage watch faces, and crystal charms.
  4. Adhere Bottom Up: Starting near the base of the dish’s exterior, apply clear two-part epoxy and press metal filigree pieces onto the glass.
  5. Tile the Exterior: Continue tiling jewelry upward until the entire outer surface is covered, leaving the inner bowl smooth and functional for holding items.

Tips & Variations

  • Tip: Do not place jewelry inside the inner basin of the bowl so that rings and keys can sit safely on a smooth surface without snagging.
  • Variation: Paint the clear glass dish with metallic gold paint before applying jewelry so the interior shines with matching warmth.

What You Need

  • Glass or ceramic trinket dish
  • Small vintage jewelry pieces, watch parts, & charms
  • Clear two-part epoxy adhesive
  • Rubbing alcohol & lint-free cloth
  • Flush wire cutters & tweezers

10. Vintage Pearl & Rhinestone Jeweled Hair Combs

What This Idea Means

Bridal and special occasion hair accessories are highly sought after. By wiring vintage pearl strands, crystal clip earrings, and small rhinestone brooches onto metal hair combs, you create timeless heirloom hairpieces for brides, prom-goers, and gala attendees.

How to Make It

  1. Select Comb Base: Choose a sturdy 20-tooth metal hair comb in silver, gold, or rose gold finish.
  2. Prepare Jewelry Focal: Select a central vintage rhinestone brooch and two complementary side earrings. Remove pin backs.
  3. Wire Base Cluster: Using fine 26-gauge silver or gold jewelry wire, wrap the central brooch securely onto the top bar of the hair comb, weaving through the teeth loops.
  4. Integrate Pearls & Crystals: Wire small branches of twisted pearls and crystal beads extending outward from the center brooch to soften the shape.
  5. Secure Wire Ends: Tuck all loose wire ends neatly into the back of the comb and dab with clear craft glue to prevent pulling or snagging on hair.
See also  22 Inspiring Indoor Crafts And Activities For Adults

Tips & Variations

  • Tip: Use flexible wire wrapping techniques rather than glue alone to ensure the weight of the jewelry stays firmly anchored to the comb teeth.
  • Variation: Create matching jeweled hairpin sets using smaller single earrings wired onto decorative bobby pins.

What You Need

  • Metal hair combs (20-tooth)
  • Vintage rhinestone brooches & cluster earrings
  • 26-gauge silver/gold jewelry wire
  • Small faux pearls & crystal beads
  • Flush wire cutters & chain-nose pliers

11. Upcycled Jewelry Christmas Tree Tabletop Ornaments

What This Idea Means

Jeweled tabletop Christmas trees made from vintage costume jewelry are beloved holiday heirloom items that fetch high prices among vintage collectors. Built on cone bases, these glittering sculptures turn discarded green, red, gold, and crystal jewelry into holiday centerpieces.

How to Make It

  1. Prepare Cone Base: Paint a styrofoam or papier-mâché cone (8 to 12 inches tall) with dark green or metallic gold acrylic paint. Wrap with green velvet or ribbon for extra grip.
  2. De-Pin Jewelry: Remove pins and clips from a large collection of green, red, clear, and gold vintage brooches, earrings, and pendants.
  3. Set Large Anchor Pieces: Glue large star or rosette brooches near the top and scattered down the body using hot glue or E6000.
  4. Layer Downward: Glue overlapping rows of earrings and brooch fragments moving from the bottom base up toward the peak.
  5. Top the Tree: Crown the top of the cone with a prominent star-shaped or sunburst vintage rhinestone brooch.

Tips & Variations

  • Tip: Use individual loose rhinestones and small pearl beads to fill any tiny gaps between larger jewelry pieces so no cone background is visible.
  • Variation: Build pastel-colored trees using pink, aqua, and pearl vintage jewelry for a shabby-chic holiday look.

What You Need

  • Papier-mâchĂ© or styrofoam cone base
  • Large quantity of vintage colored jewelry (Brooches, earrings)
  • Dark acrylic paint & velvet ribbon
  • High-temp hot glue gun or E6000
  • Flush wire cutters & tweezers

12. Vintage Watch Movement & Jewelry Steampunk Pendants

What This Idea Means

Steampunk fashion highlights exposed gears, antique clockwork, and mechanical industrial elements. Combining vintage mechanical watch movements with broken brass filigree settings, glass cabs, and tiny rhinestones creates unique industrial statement pendants.

How to Make It

  1. Source Watch Movements: Extract tiny mechanical gear movements from non-working vintage mechanical wristwatches.
  2. Select Metal Settings: Choose a hollow oval or round brass bezel cup or vintage filigree setting.
  3. Layer Components: Glue the watch movement inside the setting using clear epoxy.
  4. Add Micro Elements: Mount tiny single rhinestones, micro brass gears, or small watch hands onto the gear face for color contrast.
  5. Encapsulate (Optional): Fill the bezel cup with clear UV resin and cure under a UV lamp for a glass-smooth protective finish.
  6. Add Chain: Thread a dark gunmetal or antique brass chain through the top bail.

Tips & Variations

  • Tip: UV resin cures in minutes under a UV light tube, letting you rapidly produce finished pendants without multi-day drying times.
  • Variation: Add real dried micro-botanicals or iridescent foil beneath the watch gears for a fantasy-steampunk vibe.

What You Need

  • Non-working vintage mechanical watch movements
  • Brass pendant bezel settings
  • UV resin & UV curing lamp (or two-part epoxy)
  • Micro brass gears & loose rhinestones
  • Gunmetal or brass chain necklace with bails

13. Upcycled Rhinestone & Brooch Decorative Napkin Rings

What This Idea Means

Add glamour to wedding receptions and holiday tables with jeweled napkin rings. Plain wooden, acrylic, or metal ring bands layered with vintage rhinestone clusters, enamel flowers, and pearl earrings create upscale table settings sold in sets of 4, 6, or 8.

How to Make It

  1. Prepare Ring Bases: Obtain plain wooden or blank metal napkin rings (approx. 1.5 inch diameter). Paint or wrap in satin ribbon if desired.
  2. De-Pin Jewelry: Remove backs from medium-sized matching or color-coordinated vintage brooches and clip earrings.
  3. Center Focal Piece: Center a flat brooch or cluster earring on top of each napkin ring base.
  4. Adhere Sturdily: Apply two-part clear epoxy glue between the ring base and the flat back of the jewelry piece. Clamp with a soft spring clamp while drying.
  5. Clean & Polish: Wipe away any excess glue squeezed out from edges and polish metals with a jewelry cloth.

Tips & Variations

  • Tip: Create curated thematic sets—such as all-floral enamels for spring tables, or all-crystal clusters for winter holiday dining.
  • Variation: Wrap the napkin ring in rustic burlap twine before mounting the vintage brooch for a popular rustic-glam wedding style.

What You Need

  • Plain napkin ring bases (Wood, Metal, or Acrylic)
  • Color-coordinated vintage brooches or clip earrings
  • Two-part clear epoxy adhesive
  • Burlap or satin ribbon (optional)
  • Soft spring clamps & polishing cloth

14. Antique Key & Jewelry Charms Cluster Keychains

What This Idea Means

Combining rustic antique skeleton keys with cascading clusters of broken jewelry charms, single earrings, and crystal beads results in aesthetic keychains and bag charms that appeal to cottagecore and vintage lovers.

How to Make It

  1. Prepare Key Base: Clean an antique iron or reproduction brass skeleton key. Drill a small hole at the top bit if one isn’t present.
  2. Attach Main Ring: Pass a heavy-duty split ring or swivel lobster clasp through the top bow of the key.
  3. Assemble Charm Clusters: Attach single vintage earrings, small rhinestone charms, metal leaves, and crystal beads onto short lengths of sturdy chain using jump rings.
  4. Attach Cluster to Key: Secure the chain of charms alongside the skeleton key onto the main split ring.
  5. Add Leather/Ribbon Accent: Tie a small strip of distressed leather cord or frayed velvet ribbon to the top ring for added texture.

Tips & Variations

  • Tip: Ensure all jump rings are closed tightly using flat-nose pliers so charms do not detach inside purse pockets.
  • Variation: Attach a small vintage photo locket filled with a floral print alongside the key for a sentimental touch.

What You Need

  • Antique or vintage-style skeleton keys
  • Swivel lobster clasps & split rings
  • Broken jewelry charms, single earrings, crystal beads
  • Short lengths of sturdy metal chain
  • Leather cord or velvet ribbon scraps

15. Mosaic Junk Jewelry Mannequin Bust Decor

What This Idea Means

A mosaic jewelry mannequin bust is a high-impact art installation piece. Decorating a tabletop dress form or vintage mannequin bust entirely with hundreds of broken jewelry pieces creates a striking boutique display piece or luxury home accent.

How to Make It

  1. Prepare Dress Form: Obtain a small tabletop mannequin bust (foam or fiberglass). Paint it dark charcoal or black.
  2. Plan Focal Lines: Lightly pencil decorative neckline curves, waist belts, and sweetheart seam patterns across the bust.
  3. Outline with Chains: Glue thick vintage chains along your penciled guidelines using heavy-duty construction adhesive or E6000 to define the silhouette.
  4. Fill Panels with Jewelry: Tile broken brooches, large rhinestone earrings, and vintage pins inside the outlined zones, placing larger pieces first and filling gaps with loose pearls.
  5. Detail Neckline: Create an elaborate permanent “necklace” draping across the upper collar area using your finest crystal and rhinestone pieces.
See also  22 Colour Paper Craft Ideas

Tips & Variations

  • Tip: Work on the bust while it is laying flat on its back so heavy jewelry pieces do not slide down before glue sets.
  • Variation: Cover only the bodice area like a jeweled corset, leaving the lower portion covered in soft pleated fabric.

What You Need

  • Tabletop mannequin bust / dress form
  • Large volume of varied junk jewelry & chains
  • Heavy-duty adhesive (E6000 or Power-Tack)
  • Acrylic paint & paintbrushes
  • Wire cutters & protective gloves

16. Upcycled Brooch & Pearl Curtain Tie-Backs

What This Idea Means

Drapery accents elevate home decor instantly. By stringing thick multi-strand pearl ropes anchored by large statement vintage brooches, these upcycled curtain tie-backs bring old-world elegance to modern bedrooms and living spaces.

How to Make It

  1. Cut Heavy Cord: Cut a 20-inch piece of multi-strand coated jewelry cable or heavy decorative braided cord.
  2. Thread Pearl Strands: String large vintage faux pearls onto 3 parallel wires, securing the ends with heavy-duty crimp tubes and brass rings.
  3. Prepare Centerpiece: Select a large, heavy vintage brooch (3 to 4 inches wide). Remove the pin back and glue a sturdy brass bridge connector to the rear.
  4. Mount Centerpiece: Thread the pearl strands through the rear connector of the brooch so it sits centrally along the tie-back length.
  5. Attach Mounting Rings: Connect brass curtain rings to both outer ends of the tie-back to easily hook onto wall-mounted drapery studs.

Tips & Variations

  • Tip: Ensure the internal wire core has a high test weight (30+ lbs) so it supports heavy velvet or blackout drapes without stretching.
  • Variation: Use colorful enamel floral brooches and multi-colored beads for a whimsical summer curtain accent.

What You Need

  • Heavy-duty jewelry cable & crimp tubes
  • Large faux pearls & glass accent beads
  • Large vintage statement brooches (3-4 inches)
  • Brass drapery hook rings
  • Crimping pliers & E6000

17. Vintage Rhinestone-Adorned Velvet Jewelry Trays

What This Idea Means

Turn plain wooden or plastic serving trays into luxury vanity displays by lining the inner base with plush crushed velvet bordered by an intricate frame of upcycled vintage rhinestone jewelry and brass filigree.

How to Make It

  1. Prep Tray Frame: Sand and paint a low-profile wooden serving tray (10×14 inches) with black, dark plum, or gold lacquer paint.
  2. Upholster Base: Cut a piece of thin foam board to fit inside the tray bottom. Wrap it tightly with high-grade crushed velvet and slide it into the tray.
  3. Border with Jewelry: De-pin medium-to-small rhinestone brooches, clip earrings, and metal floral stampings.
  4. Adhere Inner Border: Glue the jewelry pieces in a continuous, interlocking border along the inside perimeter walls of the tray using E6000.
  5. Seal and Finish: Allow to cure for 24 hours. The soft velvet center holds perfume bottles and rings safely while framed by glittering vintage metalwork.

Tips & Variations

  • Tip: Keep the central velvet surface clear of raised jewelry so perfumed bottles and ring dishes can stand flat without wobbling.
  • Variation: Place a piece of clear cut glass over the velvet bottom if you prefer a wipe-clean tray surface.

What You Need

  • Low-profile wooden serving tray
  • High-grade crushed velvet fabric & foam board
  • Assorted rhinestone earrings & brooch fragments
  • Lacquer spray paint
  • E6000 adhesive & utility knife

18. Layered Vintage Jewelry Mosaic Coasters

What This Idea Means

Mosaic coasters encased in crystal-clear resin transform small vintage jewelry components—such as single earrings, watch gears, small filigree charms, and loose crystals—into functional, heat-resistant works of art.

How to Make It

  1. Select Molds: Obtain silicone coaster molds (round or hexagonal, 4-inch diameter).
  2. Pour Base Resin: Mix two-part clear casting resin according to package directions. Pour a thin 1/8-inch base layer into each mold and let it become tacky (approx. 2 hours).
  3. Arrange Jewelry Pieces: Lay flat vintage jewelry components, single clip-on earrings, and tiny pearls onto the tacky resin layer in pleasing circular arrangements.
  4. Pour Top Layer: Pour a second layer of clear resin over the jewelry, filling the mold to the brim and completely submerging all metal edges.
  5. Pop Bubbles & Cure: Pass a mini heat gun over the surface to pop micro-bubbles. Allow to cure for 48 hours before demolding.

Tips & Variations

  • Tip: Ensure all jewelry components are fully flat and lower than the mold rim so no sharp metal points stick up through the coaster surface.
  • Variation: Mix a tiny drop of translucent alcohol ink (cobalt blue or emerald) into the base resin layer for a stained-glass backdrop effect.

What You Need

  • Two-part clear casting epoxy resin
  • Silicone coaster molds (Round or Hexagon)
  • Flat junk jewelry, earrings, & watch parts
  • Mini heat gun / butane torch
  • Mixing cups & stir sticks

19. Vintage Jewelry & Lace Wall Canvas Collage

What This Idea Means

Mixed-media canvas art incorporating vintage lace trim, torn antique book pages, paint washes, and clusters of upcycled costume jewelry yields romantic, shabby-chic wall art rich in tactile depth and visual nostalgia.

How to Make It

  1. Prepare Canvas Background: Paint a 12×12 inch stretched canvas with ivory and taupe chalk paint. Decoupage torn pieces of antique sheet music or book pages onto sections of the surface.
  2. Apply Lace Layers: Glue strips of vintage cream lace trim diagonally across the canvas using Mod Podge or fabric glue.
  3. Build Jewelry Focal Points: Glue Ornate vintage brooches, single earrings, and filigree pieces at overlapping junctions along the lace lines using E6000.
  4. Apply Paint Washes: Lightly dry-brush metallic gold acrylic paint across the raised jewelry and lace edges to unify the color tones.
  5. Seal: Spray lightly with a matte clear protective sealer.

Tips & Variations

  • Tip: Use chalk paint as your base coat because its porous texture grips heavy glues and dimensional jewelry components better than slick acrylics.
  • Variation: Incorporate small vintage cabinet cards or tintype photographs into the center of the collage as historical portraits.

What You Need

  • Stretched canvas board (12×12 inches or similar)
  • Ivory/Taupe chalk paint & Mod Podge
  • Vintage lace trims & antique paper scraps
  • Assorted brooches, filigree pieces, & earrings
  • E6000 glue & metallic gold paint

20. Upcycled Junk Jewelry Photo Frame Accents

What This Idea Means

Turn standard modern photo frames into bespoke vintage treasures by building ornate jeweled corner clusters or full-rim accents out of upcycled broken earrings, rhinestone pins, and glass beads. They make ideal wedding or anniversary gifts.

How to Make It

  1. Select Frame: Choose a simple flat-faced wood or metal photo frame (5×7 or 8×10 inches). Remove glass and backing.
  2. De-Pin Jewelry: Remove backs from small-to-medium vintage rhinestone earrings, brooch ends, and metallic floral stampings.
  3. Design Corner Clusters: Arrange jewelry pieces in dense triangular fan shapes across diagonally opposing corners of the frame (top-left and bottom-right).
  4. Adhere Jewelry: Secure pieces in place using two-part clear epoxy, overlapping smaller rhinestone studs over larger filigree bases.
  5. Reassemble: Clean any stray glue strings, reinsert glass and picture, and secure the frame back.

Tips & Variations

  • Tip: Clustering jewelry solely on opposing corners leaves portions of the original frame exposed, creating a balanced, modern-vintage look.
  • Variation: Paint the photo frame matte black before adding all-clear crystal jewelry for a striking high-contrast finish.

What You Need

  • Flat-faced photo frame (5×7 or 8×10 inches)
  • Small-to-medium vintage earrings, brooches, & studs
  • Two-part clear epoxy adhesive
  • Flush wire cutters & tweezers
  • Microfiber cleaning cloth